nanoloop q is not a toy. please keep it out of the reach of children and handle batteries with care.
coin cell batteries are extremly dangerous when swallowed and can cause serious injury or death by chemical burns within two hours.
update page.
battery: CR2032 or LIR2032 coin cell
to insert, slightly bend down the bottom PCB finger

and push in the battery with the + side up. use a mini jack plug to further shift it in until the PCB finger snaps back.
push up the finger back to original position.
bend the PCB finger again and use a mini jack plug to shift out the battery via the slot on the bottom PCB.
press Y twice to start nanoloop

press all d-pad buttons to turn off nanoloop

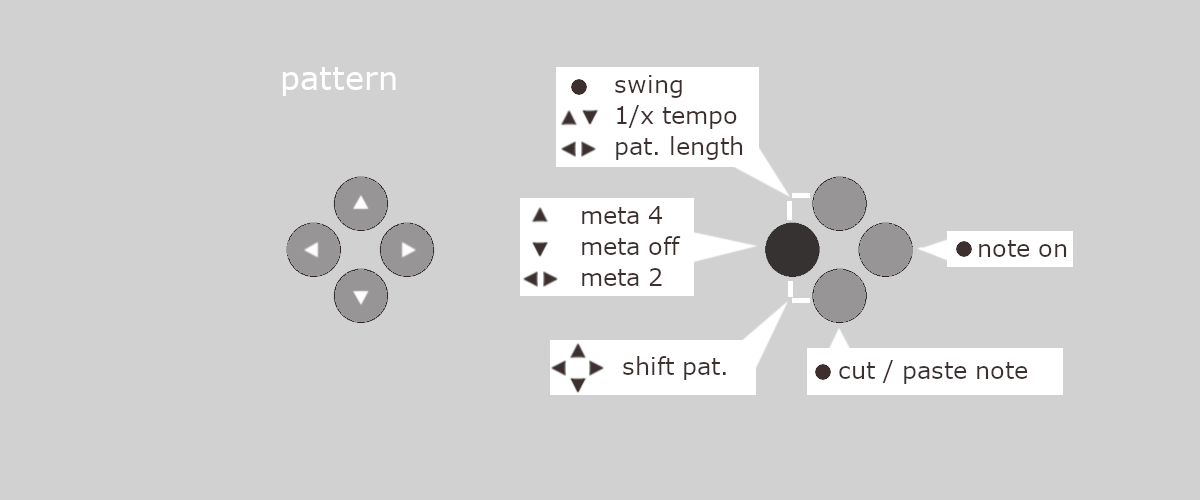
there are two modes, pattern and channel, switched via mode button Y.

pattern mode shows a single pattern, channel mode shows an overview of the four channels' patterns.
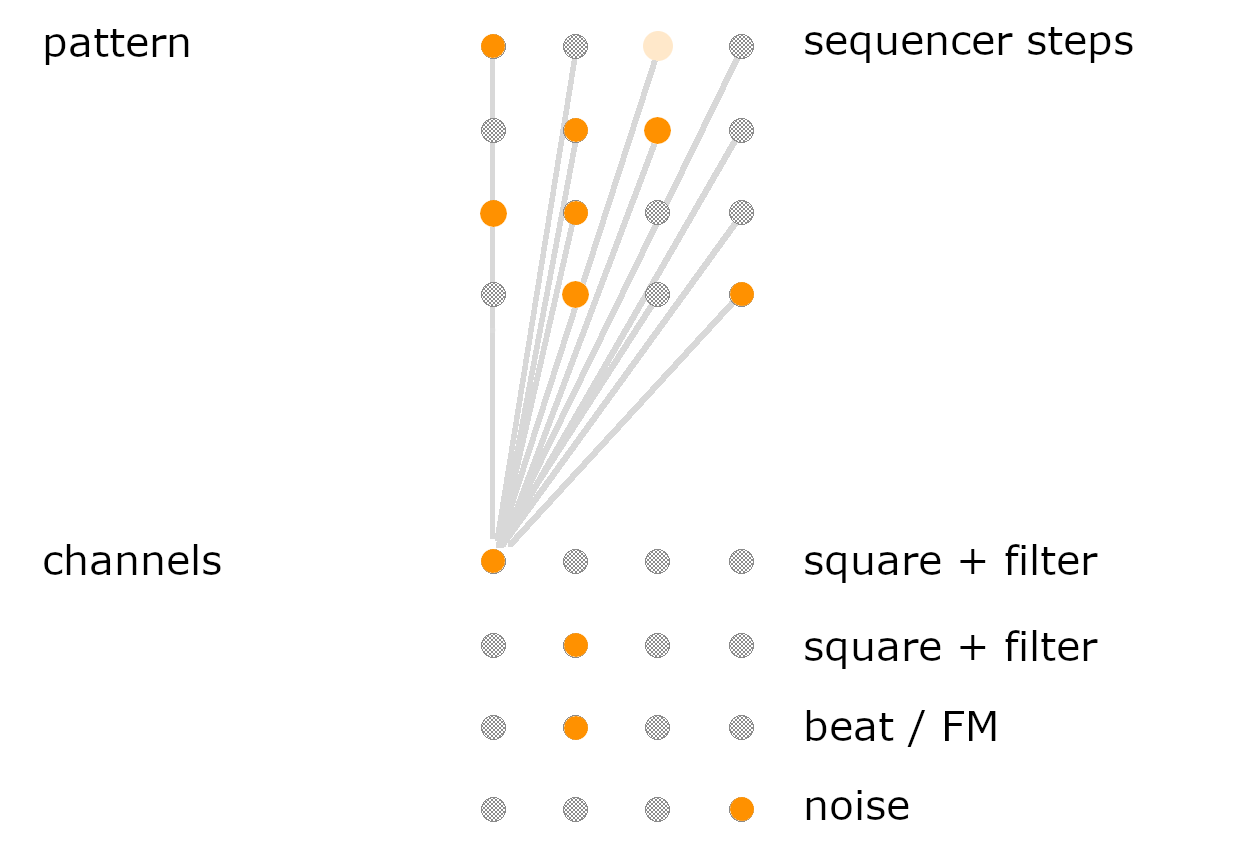
each dot represents a step in the looping 16-step pattern, playback is indicated by chasing light.
place and remove notes with the edit buttons:

each dot represents a pattern. each row forms a channel with 4 patterns.

select a pattern / channel with the lower edit button. if the pattern is already selected, it will be muted / unmuted.
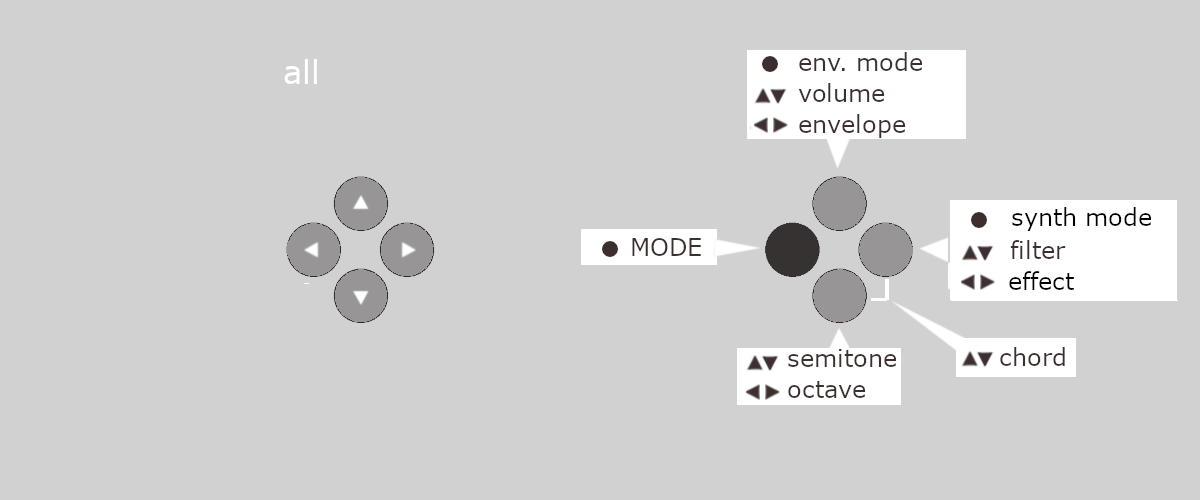
editing functions are the same in both modes. in pattern mode, only the current note is changed. in channel mode, the entire pattern's notes are affected (transpose). to edit, press and hold an edit button and change values with the d-pad.

by pressing two edit buttons together, more functions are available:

1. r square wave
| ▼ ▲ | ◀ ▶ | ● | |
| X | volume | length | shape (D/AD) |
| A | filter | pulse width | resonance |
| B | semitone | octave | on/off |
| X+A | - | left/center/right | - |
| B+A | 1st interval | 2nd interval | - |
Chord is played as arpeggio.
2. L square wave
| ▼ ▲ | ◀ ▶ | ● | |
| X | volume | length | shape (D/gate) |
| A | filter | pulse width | resonance |
| B | semitone | octave | on/off |
| X+A | - | left/center/right | - |
| B+A | 1st interval | 2nd interval | - |
Chord is played with 3 voices. The highest position plays the base note slightly detuned.
3. c beat / FM
| ▼ ▲ | ◀ ▶ | ● | |
| X | volume | length | D / LFO |
| A | punch | frequency | beat / FM |
| B | semitone | octave | on/off |
| X+A | - | left/center/right | - |
| B+A | filter / FM frequency | - | - |
4. n noise
| ▼ ▲ | ◀ ▶ | ● | |
| X | volume | length | shape (gate / AD) |
| A | noise frequency | - | noise / hihat PCM |
| - | - | - | on/off |
| X+A | - | left/center/right | - |
| - | - | - | - |
functions of the mode button are different in pattern and channel mode:

| ▼ ▲ | ◀ ▶ | ● | |
| Y+X | 1/x tempo | length | swing |
| Y: meta | 4th / all | 2nd / other 2nd | (mode) |
| Y+B: shift | up/down | left/right | - |
at 1/x speed, meta, swing and pattern length have no effect.
meta plays a step only every 2nd, every other 2nd or every 4th round.

| ▼ ▲ | ◀ ▶ | ● | |
| Y+X set | select | select | - |
| Y pattern | column | next | (mode) |
| Y+B tempo/snapshot | save/restore | tempo | - |
sets
the channel view shows one set.
there are 16 sets.
patterns of different sets can be selected for each channel.
.
column pattern selection
▲ selects the column, subsequent ◀ ▶ select the next column.
snapshots
saving to a different pattern than the currently playing will overwrite that pattern and its snapshot, e.g. duplicate the currently playing one.
hold Y + A and press d-pad:
▶ = master (when in 1/16 or 1/8 mode)
◀ = slave 1/16
▼ = slave 1/8
▲ = slave MIDI
analog volume control in 2 steps is available by holding d-pad down and then pressing up (rise) or holding up and pressing down (lower).
◀ + ▶ = more
▶ + ◀ = less
(3 levels)
to remove a button, do not open the device. instead, press a butter knife against the side of the button and shift it up so that the button springs out. to insert a new button, center the underlying knob as well as the button and carefully press it in with your thumb. if the button gets tilted please try again.